Three delivered files. Three separate checks.
The markers identify visible differences in the existing output. Select a marker to read what it means for a character reference.
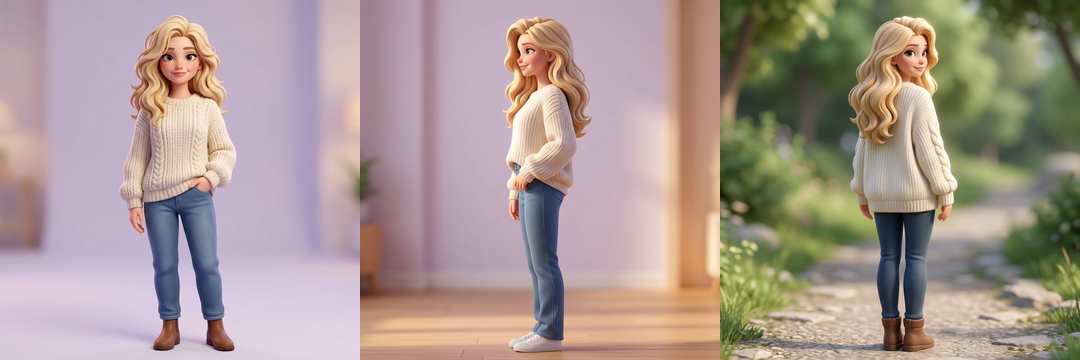
- Front: brown boots. The front image has brown boots. Check the shoes before accepting this as the fixed costume.
- Side: light sneakers. The side image changes the footwear to light sneakers. If shoes must match, these files do not meet that requirement.
- Back: head turns towards us. The third image uses an outdoor background and a turned head. Check whether that angle serves your intended back reference.
Selected detail: Front: brown boots
Use the front reference to check visible details. Review the side and back details the model had to infer.
Read the submitted test instruction
Use only the central fictional adult blonde woman in the reference. Keep her recognizable face, wavy blonde hair and white knit sweater. Ignore surrounding sample cards and lettering. Use even lighting, a simple background and comparable framing. Follow the requested expression, view or scene without turning her into a different person.
The isolated Kie/SeeAPI acceptance rechecked existing outputs under the revised safety policy, preserving the original image bytes. The selected style and each expression or view description were added by the studio. This exact test used a homepage composition with one fictional central subject; use a clear photo of one person for your own request.
01 · Choose a reference with useful detail
Use an image you own or have permission to edit. Choose one clear subject, an inspectable face, even lighting and enough visible hair and clothing to compare the results. A clear subject reference is more useful than a distant small face in a busy scene.
A front reference cannot reveal everything on the side or back. Hair shape, ears, seams, clothing closures and hidden accessories may be inferred. Treat those details as proposals to check manually, rather than verified facts about the character.
Read the first-image guide02 · Upload, adjust once and choose a style
- Choose Create character and upload first. JPG, PNG or WebP, up to 10 MiB (10,485,760 bytes) and at most 8 megapixels. Naming is optional when starting; a name is required when saving to My characters.
- Adjust the reference once. Position, crop, rotate and choose the output size, then confirm. Cancelling a replacement crop keeps the previous reference; an unconfirmed replacement does not overwrite it.
- Choose a style in the workspace. Keep the same medium across the set so you can compare the images. You can also start from a saved character reference.
03 · Select Character sheet in More options
Character sheet requests Front view, Side profile and Back view. These default view descriptions are editable. The result is three separate 2D image files, not one rotatable turnaround or a 3D mesh, rig or editable native model. A 3D-looking style changes the appearance of each image, not its file type.
Keep the view labels distinct and ask for comparable framing if you plan to place the files side by side. The side and back images can invent details hidden in a front-facing reference; their agreement with the front image still needs your review.
Use the selected reference and style. Keep visible face shape, hairline, hairstyle and clothing consistent. Use a plain background, even lighting and comparable full-body framing for the requested front, side and back images.
Suggested instruction, not the exact tested prompt. The recorded output above has its own submitted instruction.
04 · Check credits, then submit
3 views × 4 credits per image.
The one-time 4-credit starter allowance covers one standard image, not this set.
Check the selected operation and its total in the workspace before submitting. Confirm that you have permission to use the reference. A set reserves 12 credits; each successful image consumes 4 credits. Use Create character to enter the actual upload and crop flow, then open More options to select the creation type.
05 · Review the character views and any partial failure
- View: Is each image actually front, profile or back, as labelled?
- Identity: Compare face shape, hairline, hairstyle and visible distinguishing details with the reference.
- Light and composition: Look for major lighting shifts, clipped features and inconsistent framing. Compare silhouette, clothing, head direction and background across all three files. Check whether any visible seams or accessories continue plausibly into the inferred side and back.
- Unseen details: A front-only reference cannot confirm a back hairstyle, fastener or shoe design. Decide whether to accept those invented details before using the views as a character sheet.
- Task state: Inspect each child image. A confirmed failed child releases its reserved 4 credits; successful children remain charged.
- Front view Succeeded4 credits consumed
- Side profile Succeeded4 credits consumed
- Back view Failed4 credits released
Illustration: 2 succeeded, 1 failed → 8 credits consumed; 4 released. Keep the successful images and check the failed child separately.
If the provider result or settlement is unclear, use Check task status and review the job before submitting again. Reserved credits may remain while recovery is needed; an unknown state does not guarantee an immediate release. For help, include the task ID and the visible status.
Read credits and job answers06 · Download the character views you want to keep
Open each successful creation, inspect the full image and download the versions you want to keep. A partly failed set still has usable successful images. Downloading an existing result does not consume generation credits; a new generation is a separate job with its own cost.
Generated versions are accessible in the workspace for 30 days. That access window is not a promise of physical file deletion. A saved main reference remains subject to character-space entitlement. After a downgrade, extra character spaces enter a 30-day read-only period.